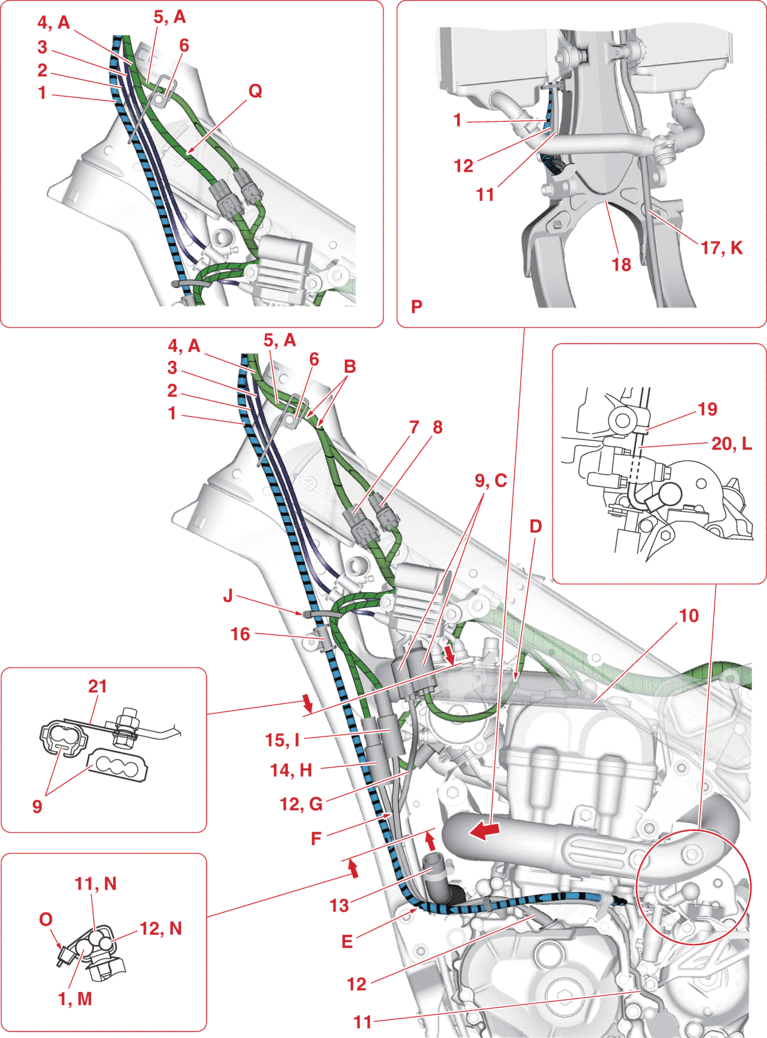
CABLE ROUTING DIAGRAM
Frame and engine (front left side view)

|
1. |
Clutch cable |
|
2. |
Throttle cable (return) |
|
3. |
Throttle cable (pull) |
|
4. |
Handlebar switch lead (left) |
|
5. |
Start switch lead |
|
6. |
Cable holder |
|
7. |
Handlebar switch coupler (left) (black, 6-pin) |
|
8. |
Start switch coupler (black, 2-pin) |
|
9. |
Rectifier/regulator coupler |
|
10. |
Tension arm |
|
11. |
Gear position switch lead |
|
12. |
Stator coil assembly lead |
|
13. |
Radiator hose |
|
14. |
Gear position switch coupler (white, 3-pin) |
|
15. |
Stator coil assembly coupler (gray, 2-pin) |
|
16. |
Grommet |
|
17. |
Radiator breather hose |
|
18. |
Down tube |
|
19. |
Clamp |
|
20. |
Starter motor lead |
|
21. |
Bracket |
|
A. |
Adjust slack in the handlebar switch lead (left) and start switch lead at the vehicle’s front side of the cable holder. |
|
B. |
Pass the handlebar switch lead (left) and the start switch lead between the frame and the cable holder. Pass the handlebar switch lead (left) above the start switch lead. |
|
C. |
Insert the rectifier/regulator 2-pin coupler (not colored) and rectifier/regulator 3-pin coupler (not colored) into the bracket and secure them. After securing, install the cover over them. |
|
D. |
Pass the rectifier/regulator lead (wire harness side) to the inside of the tension arm (the side of the vehicle). |
|
E. |
Bring the protector of the clutch cable into contact with the radiator hose, and pass it to the outside of the gear position switch lead and the stator coil assembly lead (the outside of the vehicle). |
|
F. |
Make sure that the stator coil assembly lead does not get caught between the radiator and the gear position switch 3-pin coupler (white). |
|
G. |
Pass the stator coil assembly lead behind the radiator. Be sure the lead will not be pinched between the radiator and the tension arm. |
|
H. |
After connecting the gear position switch 3-pin coupler (white), attach the coupler cover. |
|
I. |
After connecting the stator coil assembly 2-pin coupler (gray), attach the coupler cover. |
|
J. |
Fasten the clutch cable, gear position switch lead, and stator coil assembly lead over the grommet with the plastic locking tie. Point the end of the plastic locking tie to the front side of the vehicle, and then cut off it. |
|
K. |
Pass the radiator breather hose through the down tube. |
|
L. |
When fastening the starter motor lead with the clamp, close the clamp while applying tension to the starter motor lead so that the starter motor lead has no slack. |
|
M. |
Clamp the clutch cable at the front of the lead (the front of the vehicle). |
|
N. |
The routing order of the gear position switch lead and stator coil assembly lead does not matter. |
|
O. |
Insert the clip portion of the clamp into the frame. The lock part should face toward the front of the vehicle. |
|
P. |
Diagram for routing the radiator hose and radiator breather hose. |
|
Q. |
When installing the dampers and the lower handlebar holders in the front hole, be sure to route the handlebar switch lead (left) as shown in the illustration. |
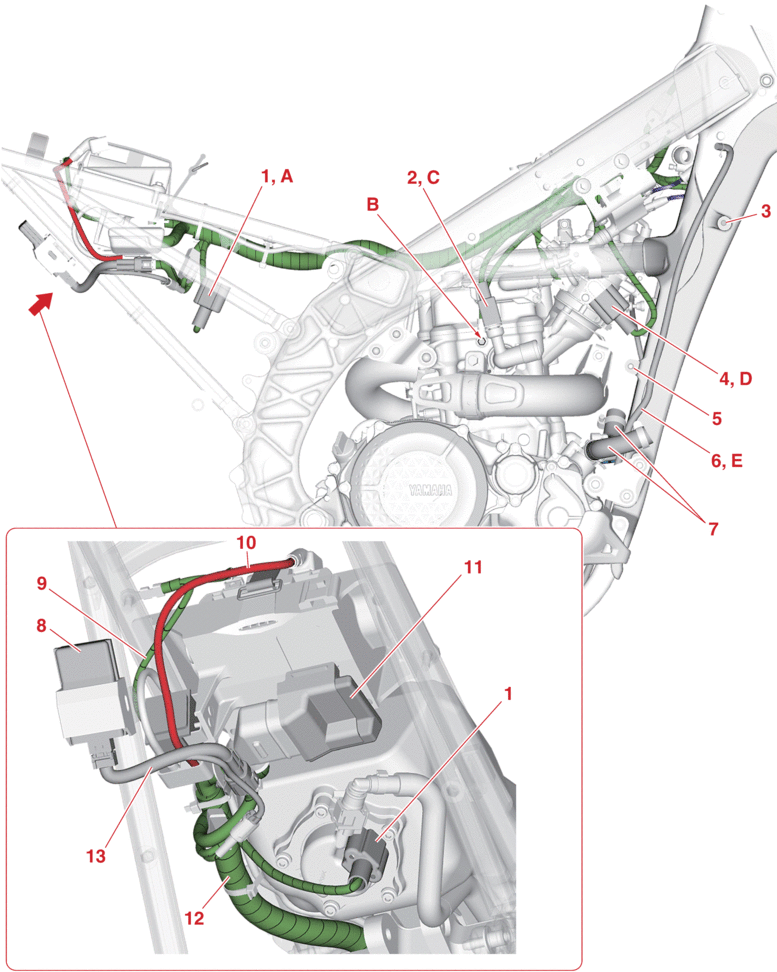
Frame (rear left side view)

|
1. |
Wire harness |
|
2. |
Rear frame |
|
3. |
Plastic locking tie |
|
4. |
Starter relay coupler (black, 4-pin) |
|
5. |
Starter motor lead |
|
6. |
Positive battery lead |
|
7. |
Negative battery lead |
|
8. |
CCU (Communication Control Unit) |
|
9. |
Rear fender (projection) |
|
10. |
Starter relay |
|
11. |
Starter relay cover |
|
12. |
CCU coupler |
|
13. |
Wire harness |
|
14. |
Diode |
|
A. |
Fasten the starter motor lead and wire harness to the rear frame at the white tape position of the wire harness using the plastic locking tie. Point the lock portion of the wire harness to the lower side of the vehicle while pointing the end of the lock portion to the outside of the vehicle, and then cut off the end. |
|
B. |
Route the starter motor lead between the starter relay and the rear fender. Adjust any slack between the starter relay and the plastic locking tie of the rear frame. |
|
C. |
Route the positive battery lead on the outside of the projection on the rear fender (outside the vehicle). |
|
D. |
Insert the starter relay into the battery bracket, and secure it. |
|
E. |
Install the starter relay cover over the starter relay. |
|
F. |
Insert the CCU coupler into the battery bracket so that the coupler is located on the inside (of the vehicle), and then secure it. |
|
G. |
Insert the clip portion of the clamp into the frame. Fasten the starter motor lead and wire harness at the green tape of the wire harness. Point the end to the lower side of the vehicle, and then cut off it. |
|
H. |
Point the starter motor lead to the outside, and then install it. |
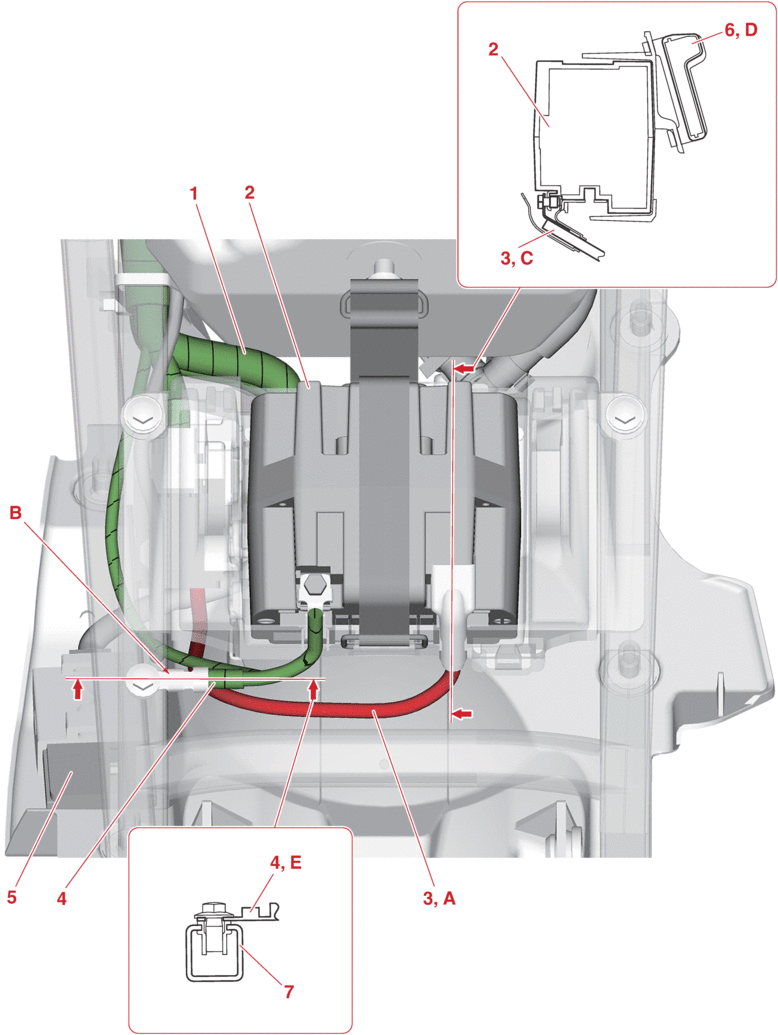
Frame and engine (right side view)
|
1. |
Fuel pump coupler (black, 5-pin) |
|
2. |
Coolant temperature sensor coupler (black, 2-pin) |
|
3. |
Upper radiator boss |
|
4. |
Throttle position sensor coupler (black, 3-pin) |
|
5. |
Lower radiator boss |
|
6. |
Radiator breather hose |
|
7. |
Radiator hose |
|
8. |
CCU (Communication Control Unit) |
|
9. |
Wire harness (to the negative battery coupler) |
|
10. |
Positive battery lead |
|
11. |
ECU (Engine Control Unit) |
|
12. |
Wire harness |
|
13. |
CCU sub-lead |
|
A. |
After connecting, install the cover over the fuel pump 5-pin coupler (black). |
|
B. |
When installing the engine ground lead terminal, it can face either way. Point the engine ground lead to the upper side of the vehicle, and then install it. |
|
C. |
After connecting the water temperature sensor 2-pin coupler (black), install the cover over it. |
|
D. |
After connecting the throttle position sensor 3-pin coupler (black), install the cover over it. |
|
E. |
The radiator breather hose should be routed in the following order and via each mentioned point. |
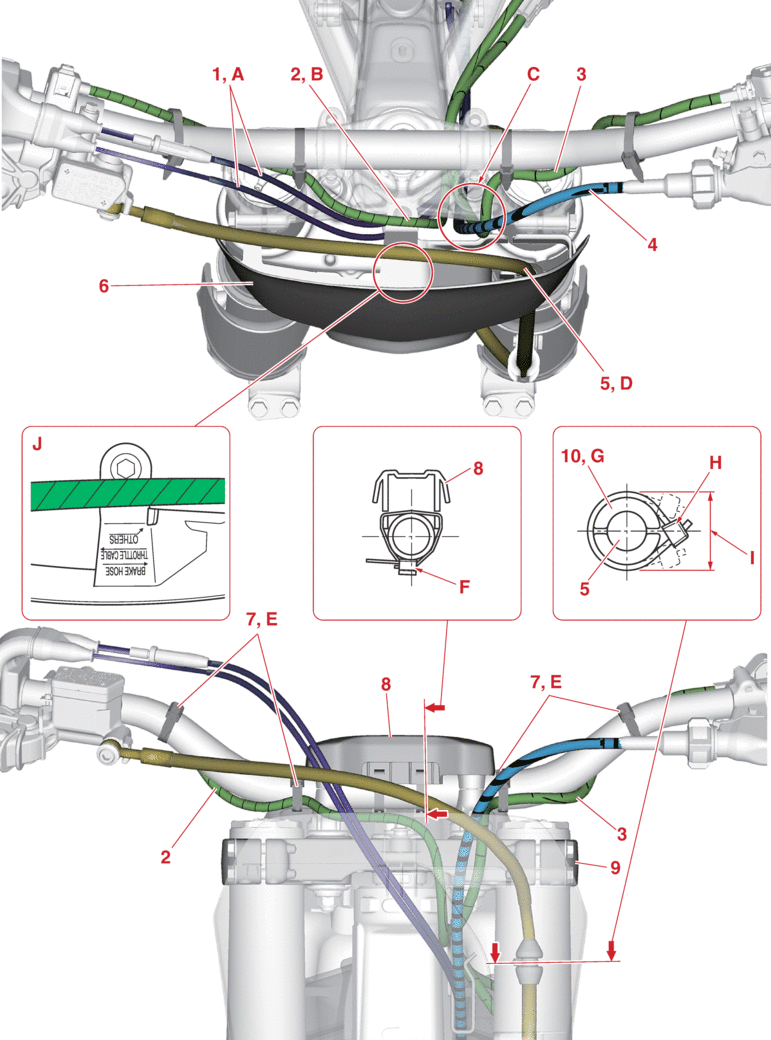
Handlebar (front view)
|
1. |
Throttle cable |
|
2. |
Start switch lead |
|
3. |
Handlebar switch lead (left) |
|
4. |
Clutch cable |
|
5. |
Front brake hose |
|
6. |
Number plate |
|
7. |
Plastic locking tie |
|
8. |
Handlebar protector |
|
9. |
Upper bracket |
|
10. |
Protector |
|
A. |
Route the throttle cable on the right side of the number plate mounting bracket. |
|
B. |
Route the start switch lead on the left side of the number plate mounting bracket. |
|
C. |
Route the start switch lead, handlebar switch lead (left), and clutch cable on the left side of the number plate mounting bracket between the upper guide of the number plate and the upper bracket. |
|
D. |
Route the front brake hose through the number plate upper guide. |
|
E. |
Secure the start switch lead and handlebar switch lead (left) to the handlebar using the plastic locking tie. Point the lock portion of the plastic locking tie to the upper part of the vehicle while pointing the end to the front side of the vehicle without cutting off it. |
|
F. |
Secure the handlebar and handlebar protector with the plastic locking tie. Point the lock portion of the plastic locking tie to the lower side of the vehicle. The direction of the end does not matter. |
|
G. |
When installing the protector, the clearance and direction of it does not matter. |
|
H. |
Fasten the front brake hose and protector with the plastic locking tie. Point the lock portion to the inside of the vehicle, and then cut off the end of the plastic locking tie. |
|
I. |
Place the lock portion within the area shown by the arrow. |
|
J. |
Route the cables according to the instructions on the number plate. |
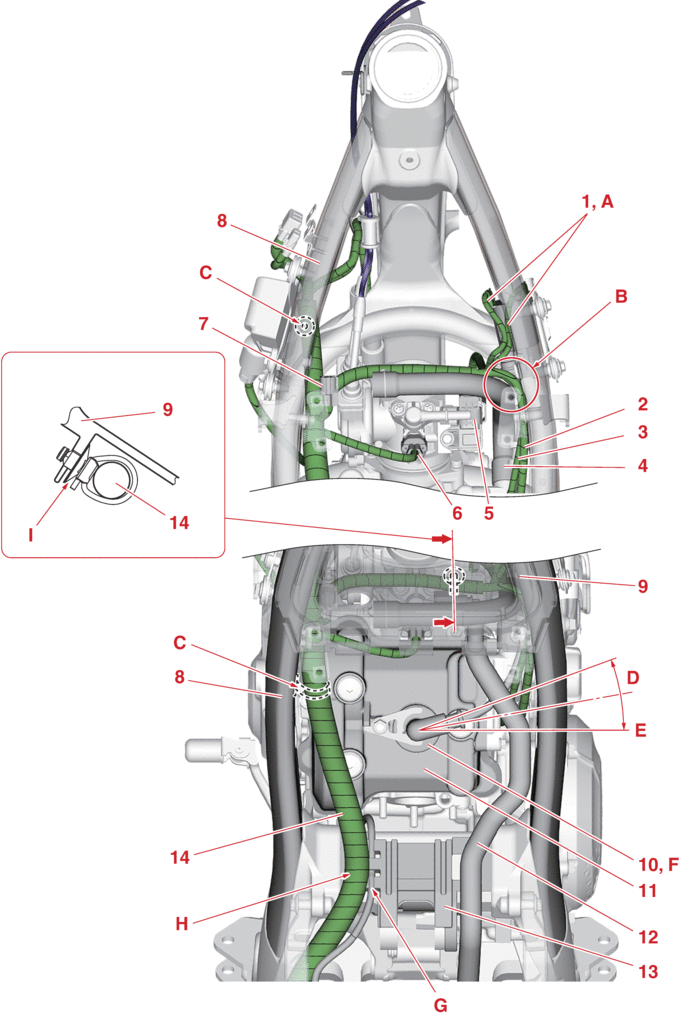
Frame and engine (top view)
|
1. |
Ignition coil lead |
|
2. |
Coolant temperature sensor lead |
|
3. |
Engine ground lead |
|
4. |
Cylinder head breather hose |
|
5. |
Intake air pressure sensor coupler (dark blue, 3-pin) |
|
6. |
Fuel injector coupler (gray, 2-pin) |
|
7. |
Intake air temperature sensor coupler (black, 2-pin) |
|
8. |
Tank rail |
|
9. |
Air filter case |
|
10. |
Spark plug cap |
|
11. |
Cylinder head cover |
|
12. |
Fuel hose |
|
13. |
Damper |
|
14. |
Wire harness |
|
A. |
Install the terminal so that the lead is positioned above the vehicle. Connect the black cover of the ignition coil lead to the black terminal of the ignition coil, and the white cover to the green terminal. |
|
B. |
Route the coolant temperature sensor lead, engine ground lead, and high tension cord outside the vehicle past the cylinder head breather hose. |
|
C. |
Insert the projection of the main harness into the hole in the frame. |
|
D. |
0–20° |
|
E. |
Right side of the vehicle. |
|
F. |
Insert the spark plug cap all the way into the cylinder head cover so that there is no clearance between the cap and the cover. |
|
G. |
Route the starter motor lead along the damper and clamp it. |
|
H. |
Place the wire harness on the flat surface on the upper side of the damper. When doing so, be careful so that the wire harness does not contact the engine. |
|
I. |
Insert the clip portion of the clamp into the air filter assembly. |
Frame and battery (top view)
|
1. |
ECU lead |
|
2. |
Battery |
|
3. |
Positive battery lead |
|
4. |
Negative battery lead |
|
5. |
CCU (Communication Control Unit) |
|
6. |
ECU (Engine Control Unit) |
|
7. |
Rear frame |
|
A. |
Route the positive battery lead under the vehicle’s negative battery lead. |
|
B. |
Point the terminal of the negative battery lead to the inside of the vehicle, and install it. |
|
C. |
After connecting the positive battery lead in the direction shown in the illustration, put the cover over it. |
|
D. |
After connecting the ECU coupler, put the coupler cover over it. |
|
E. |
Install the terminal in the direction shown. |
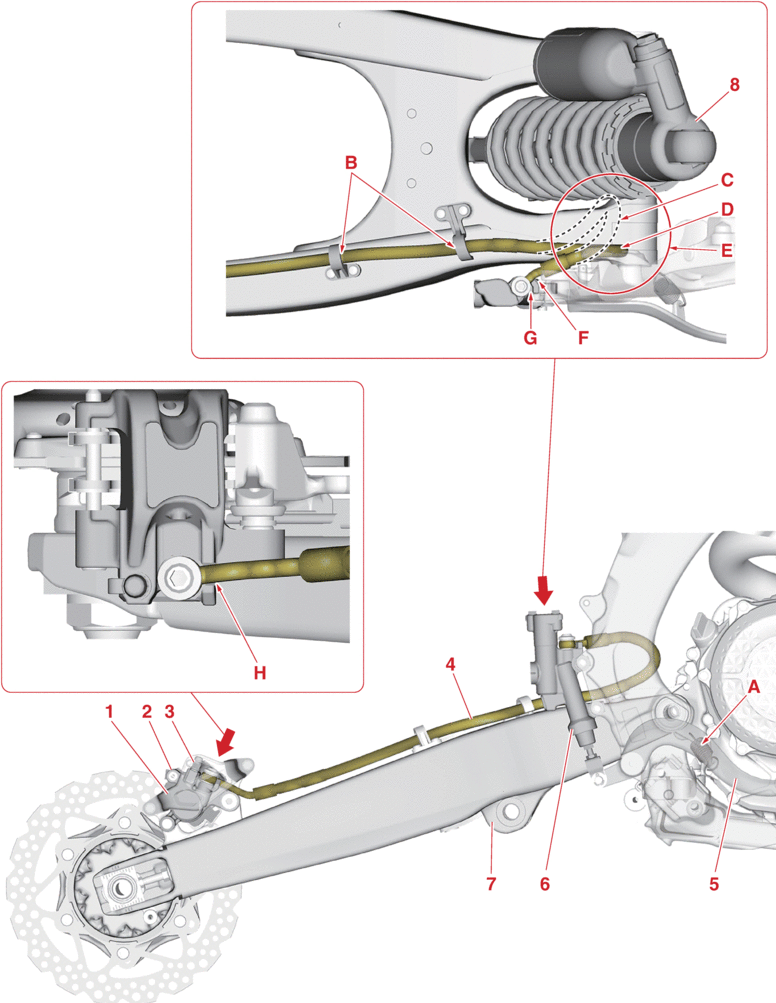
Rear brake (right side view)
|
1. |
Protector |
|
2. |
Rear brake caliper |
|
3. |
Bleed screw |
|
4. |
Rear brake hose |
|
5. |
Brake pedal |
|
6. |
Rear brake master cylinder assembly |
|
7. |
Swingarm |
|
8. |
Rear shock absorber assembly |
|
A. |
It does not matter whether the spring is installed upward or downward. |
|
B. |
Pass the rear brake hose into the rear brake hose holders. |
|
C. |
Route the rear brake hose so that it is not bent as shown by the double-dash line. |
|
D. |
Route the rear brake hose and spring so that they do not interfere with each other. |
|
E. |
Make sure that the rear brake hose is not excessively twisted. |
|
F. |
Make sure that the metal part of the rear brake hose contacts the stopper of the rear brake master cylinder. |
|
G. |
Install the rear brake hose so that the bended portion of the metal part of the rear brake hose faces as shown in the illustration. |
|
H. |
Make sure that the metal part of the rear brake hose contacts the stopper of the rear brake caliper. |