Drive chain slack
The drive chain slack should be checked before each ride and adjusted if necessary.
To check the drive chain slack
Place the motorcycle on the sidestand.
When checking and adjusting the drive chain slack, there should be no weight on the motorcycle.
Shift the transmission into the neutral position.
Push down on the drive chain under the end of the drive chain guard.
Measure distance A between the drive chain guard and the center of the chain as shown.
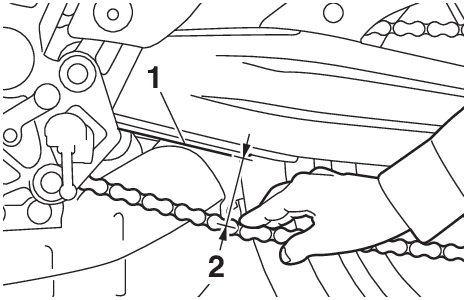
- Drive chain guard
- Distance A
- Distance A:
- 51.0–56.0 mm (2.01–2.20 in)
If distance A is incorrect, adjust it as follows. NOTICE: Improper drive chain slack will overload the engine as well as other vital parts of the motorcycle and can lead to chain slippage or breakage. If distance A is more than 58.0 mm (2.28 in), the chain can damage the frame, swingarm, and other parts. To prevent this from occurring, keep the drive chain slack within the specified limits.
To adjust the drive chain slack
Consult a Yamaha dealer before adjusting the drive chain slack.
Loosen the locknut at each end of the swingarm, and then loosen the axle nut.
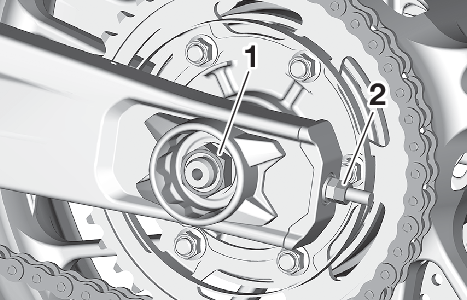
- Axle nut
- Locknut
To tighten the drive chain, turn the drive chain slack adjusting nut at each end of the swingarm in direction (a). To loosen the drive chain, turn the adjusting nut at each end of the swingarm in direction (b), and then push the rear wheel forward.
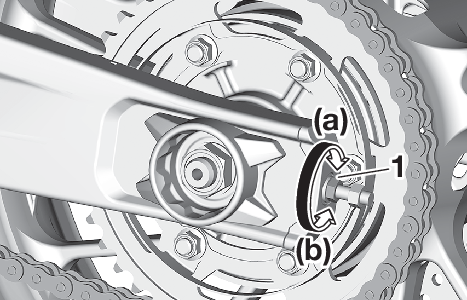
- Drive chain slack adjusting nut
Using the alignment marks on each side of the swingarm, make sure that both drive chain slack adjusting plates are in the same position for proper wheel alignment.
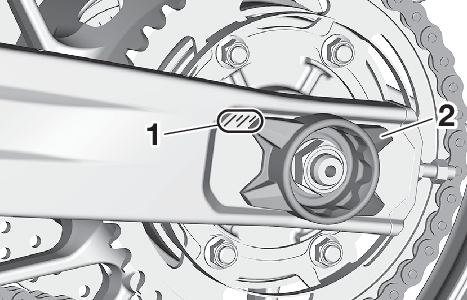
- Alignment marks
- Drive chain slack adjusting plate
Tighten the axle nut, and then tighten the locknuts to the specified torques.
- Tightening torques:
- Axle nut:
- 105 N·m (10.5 kgf·m, 77 lb·ft)
- Locknut:
- 16 N·m (1.6 kgf·m, 12 lb·ft)
Make sure that the drive chain slack adjusting plates are in the same position, the drive chain slack is correct, and the drive chain moves smoothly.