Multi-function meter unit

- Eco indicator “ECO”
- Speedometer
- Tachometer
- Transmission gear display
- Clock
- Fuel meter
- Multi-function display
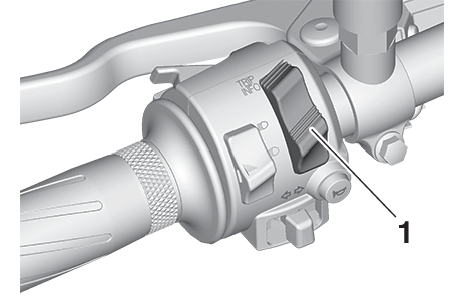
- “TRIP/INFO” switch
The multi-function meter unit is also equipped with a brightness control mode.
Be sure to stop the vehicle before making any setting changes to the multi-function meter unit. Changing settings while riding can distract the operator and increase the risk of an accident.
Switching the display units
The display units can be switched between kilometers and miles.
To switch the display units
Set the multi-function display to the odometer, and then turn the vehicle off.
While pushing the “TRIP” switch, turn the vehicle on.
Continue to push the “TRIP” switch until the display units change.
Speedometer
The speedometer shows the vehicle’s traveling speed.
Tachometer
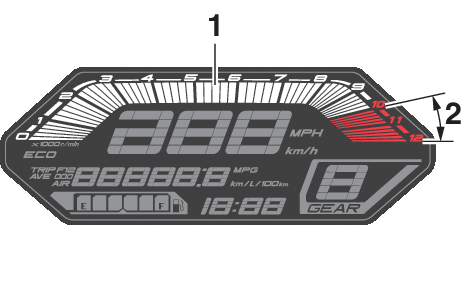
- Tachometer
- Tachometer red zone
The tachometer allows the rider to monitor the engine speed and keep it within the ideal power range.
Do not operate the engine in the tachometer red zone.
Red zone: 10000 r/min and above
Fuel meter
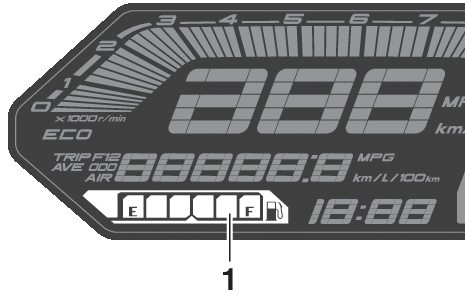
- Fuel meter
The fuel meter indicates the amount of fuel in the fuel tank. The display segments of the fuel meter disappear from “F” (full) towards “E” (empty) as the fuel level decreases. When approximately 2.7 L (0.71 US gal, 0.59 Imp.gal) of fuel remains, the last segment starts flashing. Refuel as soon as possible.
If a problem is detected in the electrical circuit, the fuel level segments will flash repeatedly. If this occurs, have a Yamaha dealer check the vehicle.
Eco indicator
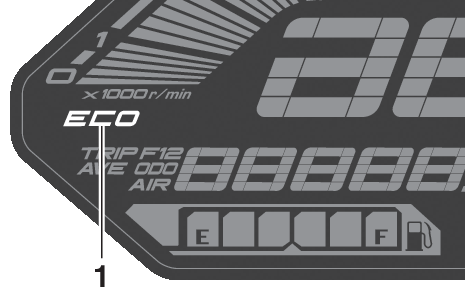
- Eco indicator “ECO”
This indicator comes on when the vehicle is being operated in an environmentally friendly, fuel-efficient manner. The indicator goes off when the vehicle is stopped.
Consider the following tips to reduce fuel consumption:
- Avoid high engine speeds during acceleration.
- Travel at a constant speed.
- Select the transmission gear that is appropriate for the vehicle speed.
Clock

- Clock
The clock uses a 12-hour time system.
To set the clock
With the display in the odometer, push the “TRIP” switch until the hour digits start flashing.
Use the “TRIP” switch to set the hours.
Push the “INFO” switch and the minute digits start flashing.
Use the “TRIP” switch to set the minutes.
Push the “INFO” switch to confirm the settings.
Transmission gear display
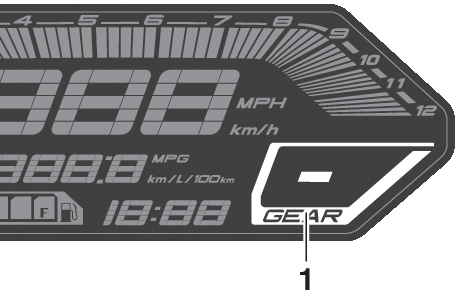
- Transmission gear display
This display shows the selected gear. The neutral position is indicated by “–” and by the neutral indicator light.
Multi-function display
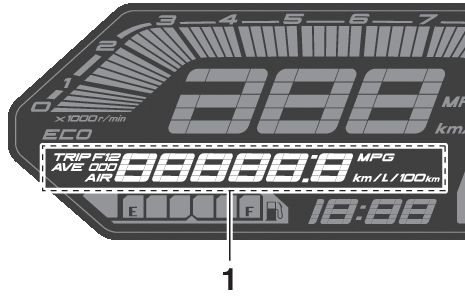
- Multi-function display
The multi-function display is equipped with the following:
- an odometer (ODO)
- two tripmeters (TRIP 1 and TRIP 2)
- a fuel reserve tripmeter (TRIP F)
- an instantaneous fuel consumption display (km/L, L/100 km, or MPG)
- an average fuel consumption display (AVE_ _._ km/L, AVE_ _._ L/100 km, or AVE_ _ _._ MPG)
- a coolant temperature display (_ _ °F)
- an air temperature display (Air_ _ °F)
Push the “TRIP” switch to change the display in the following order:
ODO → TRIP 1 → TRIP 2 → TRIP F → km/L or L/100 km or MPG → AVE_ _._ km/L or AVE_ _._ L/100 km or AVE_ _._ MPG → _ _ °F → Air_ _ °F → ODO
- The fuel reserve tripmeter appears only when you are low on fuel.
- Push the “INFO” switch to change the display in the reverse order.
Odometer
The odometer shows the total distance traveled by the vehicle.
The odometer will lock at 999999 and cannot be reset.
Tripmeters
The tripmeters show the distance traveled since they were last reset.
To reset a tripmeter, change the display to the tripmeter you want to reset, and while the digits are flashing, push the “INFO” switch until it is reset.
The tripmeters will reset and continue counting after 9999.9 is reached.
Fuel reserve tripmeter
If the last segment of the fuel meter starts flashing, the display automatically changes to the fuel reserve tripmeter “TRIP F” and starts counting the distance traveled from that point.
To reset the fuel reserve tripmeter, change the display to the fuel reserve tripmeter, and while the digits are flashing, push the “INFO” switch until it is reset.
If you do not reset the fuel reserve tripmeter manually, it will reset automatically and disappear from the display after refueling and traveling 5 km (3 mi).
Instantaneous fuel consumption display
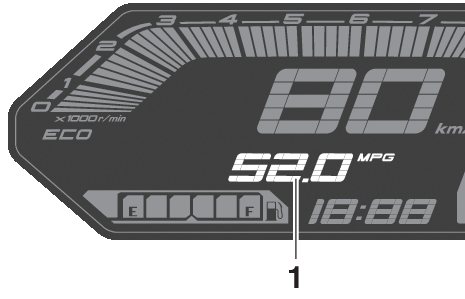
- Instantaneous fuel consumption display
This display shows the fuel consumption under the current riding conditions. It can be set to either “km/L” or “L/100 km”, or “MPG” when using miles. To switch the fuel consumption measurement units, push the “TRIP” switch until the measurement units change.
- “km/L”: the distance that can be traveled on 1.0 L of fuel.
- “L/100 km”: the amount of fuel necessary to travel 100 km.
- “MPG”: the distance that can be traveled on 1.0 US gal of fuel.
When traveling under 10 km/h (6 mi/h), “_ _._” is displayed.
The instantaneous fuel consumption function should be used for general reference only. Do not use this figure to estimate the distance that can be traveled on the current tank of fuel.
Average fuel consumption display
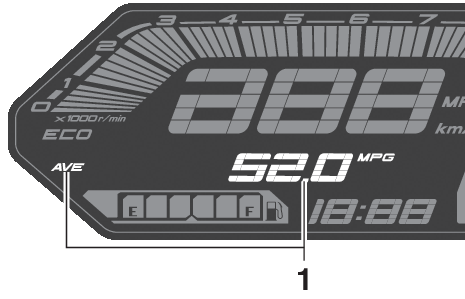
- Average fuel consumption display
This display shows the average fuel consumption since it was last reset. The average fuel consumption display can be set to either “AVE_ _._ km/L” or “AVE_ _._ L/100 km”, or “AVE_ _._ MPG” when using miles. To switch the fuel consumption measurement units, push the “TRIP” switch until the measurement units change.
- “AVE_ _._ km/L”: the average distance that can be traveled on 1.0 L of fuel.
- “AVE_ _._ L/100 km”: the average amount of fuel necessary to travel 100 km.
- “AVE_ _._ MPG”: the average distance that can be traveled on 1.0 US gal of fuel.
- To reset the display, change the display to the average fuel consumption display, and while the digits are flashing, push the “INFO” switch until it is reset.
- After resetting, “_ _._” is shown until the vehicle has traveled some distance.
Coolant temperature display
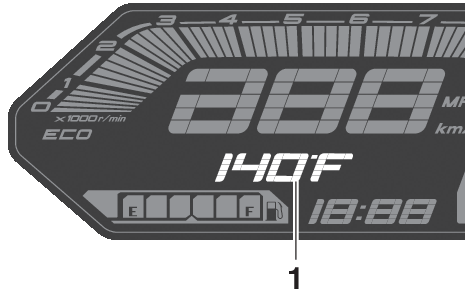
- Coolant temperature display
This display shows the coolant temperature from 104 °F to 242 °F in 1 °F increments.
If the message “Hi” flashes, stop the vehicle, then stop the engine, and let it cool.
- When the coolant temperature is below 104 °F, “Lo” will be displayed.
- The coolant temperature varies with changes in the weather and engine load.
Air temperature display
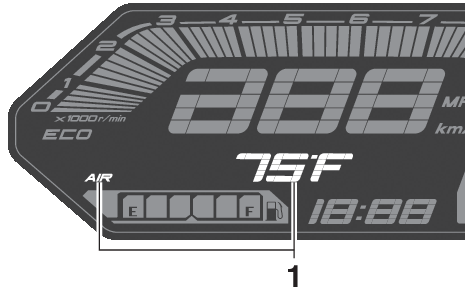
- Air temperature display
This display shows the air temperature from 14 °F to 210 °F in 1 °F increments. The temperature displayed may vary from the actual ambient temperature.
When the temperature is below 14 °F, “Lo” will be displayed.
Brightness control mode
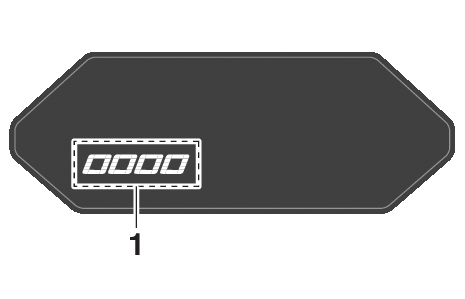
- Brightness level display
The brightness level of the multi-function meter unit panel can be adjusted.
To adjust the brightness
Turn the vehicle power off.
Push and hold the “INFO” switch.
Turn the vehicle power on and continue pushing the “INFO” switch until the display switches to the brightness control mode.
Push the “TRIP” switch to set the brightness level.
Push the “INFO” switch to confirm the selected brightness level and exit the brightness control mode.
There are 4 brightness level settings.