REAR SHOCK ABSORBER ASSEMBLY
|
Removing the rear shock absorber assembly 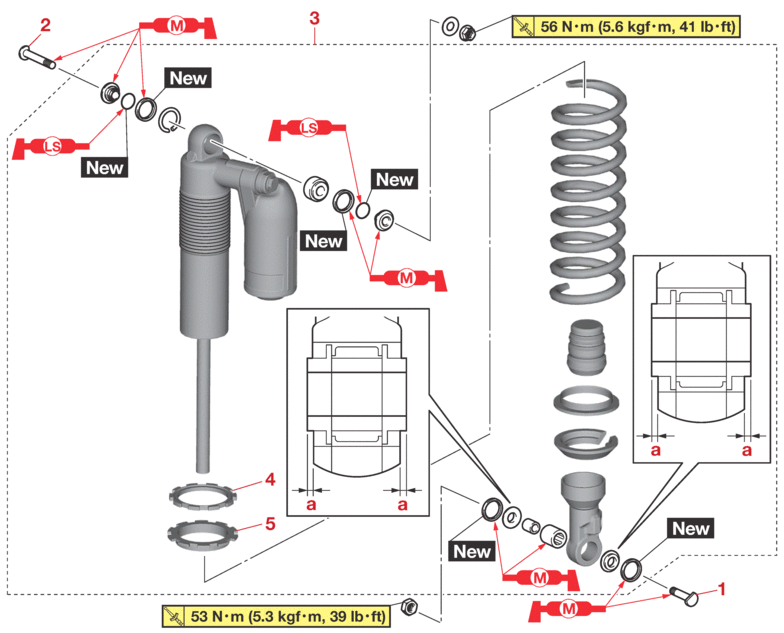 |
|||
|---|---|---|---|
|
Order |
Job/Parts to remove |
Q’ty |
Remarks |
|
|
Seat |
|
Refer to GENERAL CHASSIS. |
|
|
Side cover (left/right) |
|
Refer to GENERAL CHASSIS. |
|
|
Shroud (left/right) |
|
Refer to GENERAL CHASSIS. |
|
|
Fuel tank |
|
Refer to FUEL TANK. |
|
1 |
Rear shock absorber assembly lower bolt |
1 |
|
|
2 |
Rear shock absorber assembly upper bolt |
1 |
|
|
3 |
Rear shock absorber assembly |
1 |
|
|
4 |
Locknut |
1 |
|
|
5 |
Adjusting nut |
1 |
|
|
Removing the rear shock absorber assembly 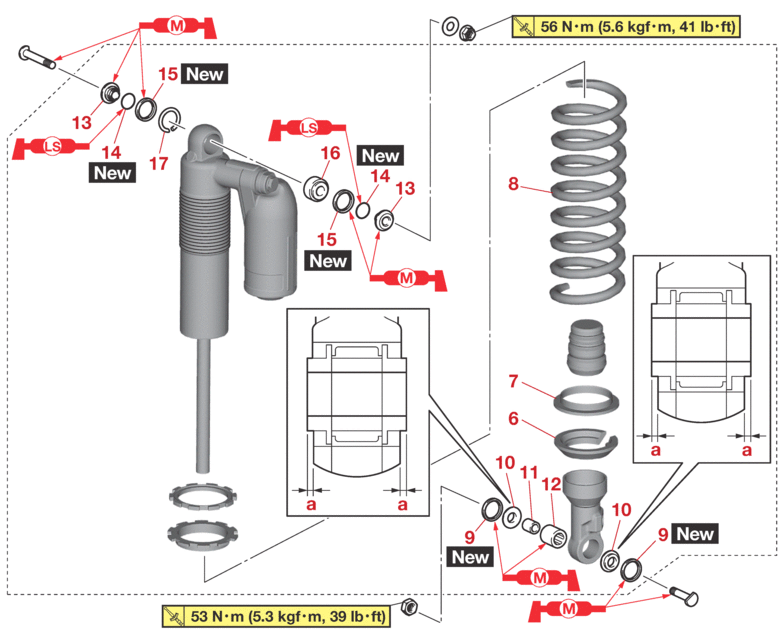 |
|||
|---|---|---|---|
|
Order |
Job/Parts to remove |
Q’ty |
Remarks |
|
6 |
Lower spring guide |
1 |
|
|
7 |
Upper spring guide |
1 |
|
|
8 |
Spring |
1 |
|
|
9 |
Dust seal |
2 |
|
|
10 |
Collar |
2 |
[“a” = 0.3 mm (0.01 in) or more] |
|
11 |
Bushing |
1 |
|
|
12 |
Bearing |
1 |
|
|
13 |
Collar |
2 |
|
|
14 |
O-ring |
2 |
|
|
15 |
Dust seal |
2 |
|
|
16 |
Bushing |
1 |
|
|
17 |
Stopper ring |
1 |
|
|
Disassembling the relay arm 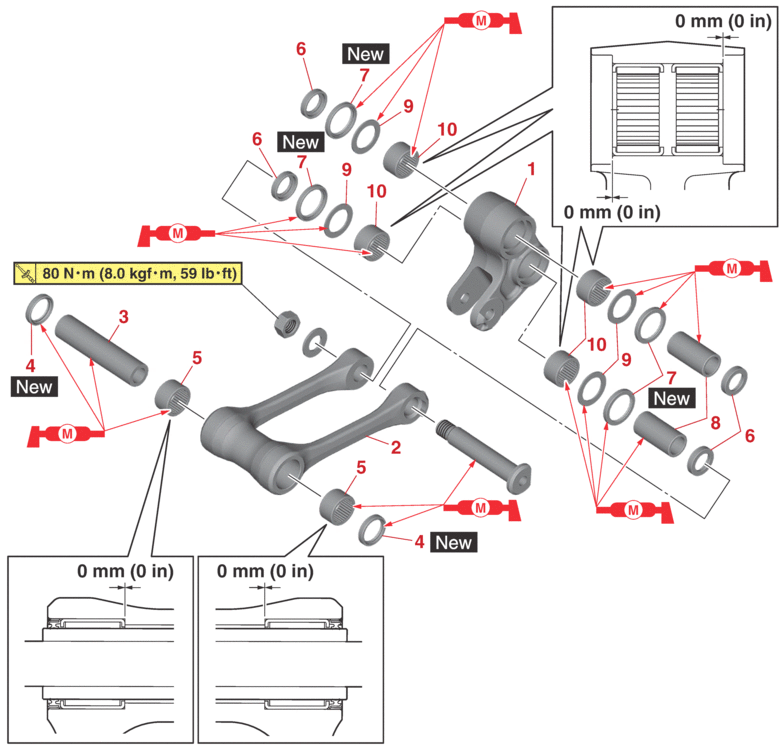 |
|||
|---|---|---|---|
|
Order |
Job/Parts to remove |
Q’ty |
Remarks |
|
1 |
Relay arm |
1 |
|
|
2 |
Connecting arm |
1 |
|
|
3 |
Collar |
1 |
|
|
4 |
Oil seal |
2 |
|
|
5 |
Bearing |
2 |
|
|
6 |
Washer |
4 |
|
|
7 |
Oil seal |
4 |
|
|
8 |
Collar |
2 |
|
|
9 |
Washer |
4 |
|
|
10 |
Bearing |
4 |
|
HANDLING THE REAR SHOCK ABSORBER
|
|
DISPOSING OF A REAR SHOCK ABSORBER
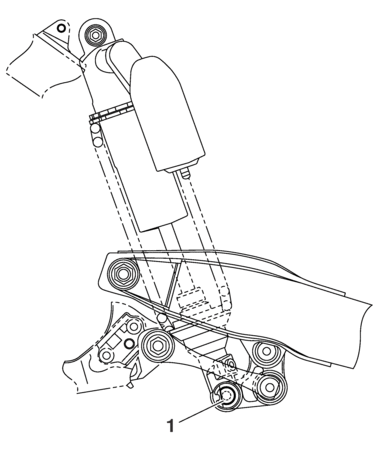
Before disposing the rear shock absorber, be sure to extract the nitrogen gas from valve “1”.
|
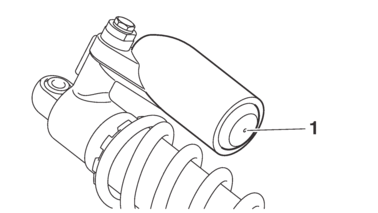
REMOVING THE REAR SHOCK ABSORBER ASSEMBLY
1.Use a maintenance stand to raise the rear wheel off the ground.
|
2.Remove:
-
Rear shock absorber assembly lower bolt “1”
|
3.Remove:
-
Rear shock absorber assembly upper bolt
-
Rear shock absorber assembly
CHECKING THE REAR SHOCK ABSORBER ASSEMBLY
1.Check:
-
Rear shock absorber rod
Bends/damage → Replace the rear shock absorber assembly.
-
Rear shock absorber
Gas leaks/oil leaks → Replace the rear shock absorber assembly.
-
Spring
Damage/wear → Replace.
-
Spring guide
Damage/wear → Replace.
-
Bearing
Damage/wear → Replace.
-
Bolt
Bends/damage/wear → Replace.
CHECKING THE CONNECTING ARM AND RELAY ARM
1.Check:
-
Connecting arm
-
Relay arm
Damage/wear → Replace.
2.Check:
-
Bearing
-
Collar
Damage/pitting/scratches → Replace the bearings and collars as a set.
3.Check:
-
Oil seal
Damage/pitting → Replace.
INSTALLING THE RELAY ARM
1.Lubricate:
-
Oil seal
-
Bearing
-
Washer
-
Collar
|
2.Install:
-
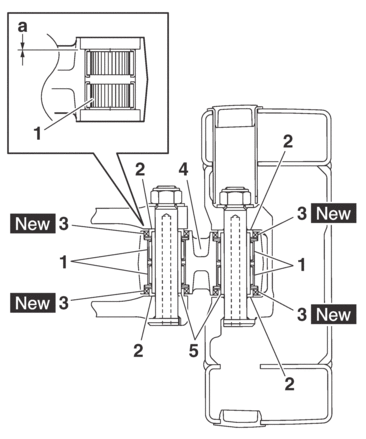
Bearing “1”
-
Washer “2”
-
Oil seal “3”

(into the relay arm “4”)
-
Collar “5”
|
INSTALLING THE CONNECTING ARM
1.Install:
-
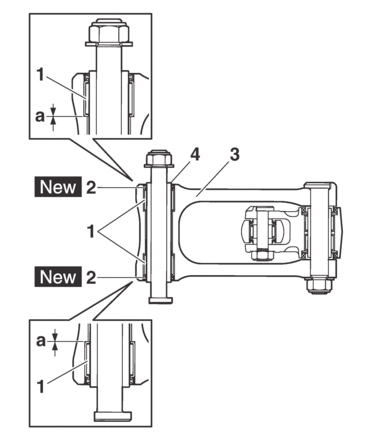
Bearing “1”
-
Oil seal “2”

(into the connecting arm “3”)
-
Collar “4”
|
INSTALLING THE REAR SHOCK ABSORBER ASSEMBLY
1.Lubricate:
-
Bearing (lower side)
-
Dust seal
|
|
2.Lubricate:
-
O-ring
|
3.Install:
-
Bushing
-
Stopper ring
(into the rear shock absorber assembly (upper side))
|
4.Install:
-
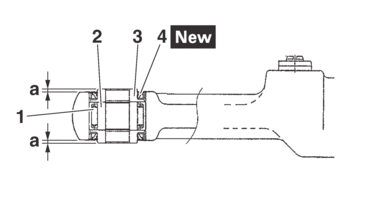
Bearing “1”
-
Bushing “2”
-
Collar “3”
-
Dust seal “4”

(into the rear shock absorber assembly (lower side))
|
|
5.Lubricate:
-
Connecting arm and frame bolt
-
Relay arm and connecting arm bolt
-
Relay arm and swingarm bolt
(circumference and threaded portion)
-
Rear shock absorber assembly upper bolt
-
Rear shock absorber assembly lower bolt
|
6.Install:
-
Rear shock absorber assembly
|
7.Tighten:
-
Rear shock absorber assembly upper nut
|
-
Connecting arm nut (frame side)
|
-
Connecting arm nut (relay arm side)
|
-
Relay arm nut (swingarm side)
|
-
Rear shock absorber assembly lower nut
|


