REAR BRAKE

|
Removing the rear brake caliper 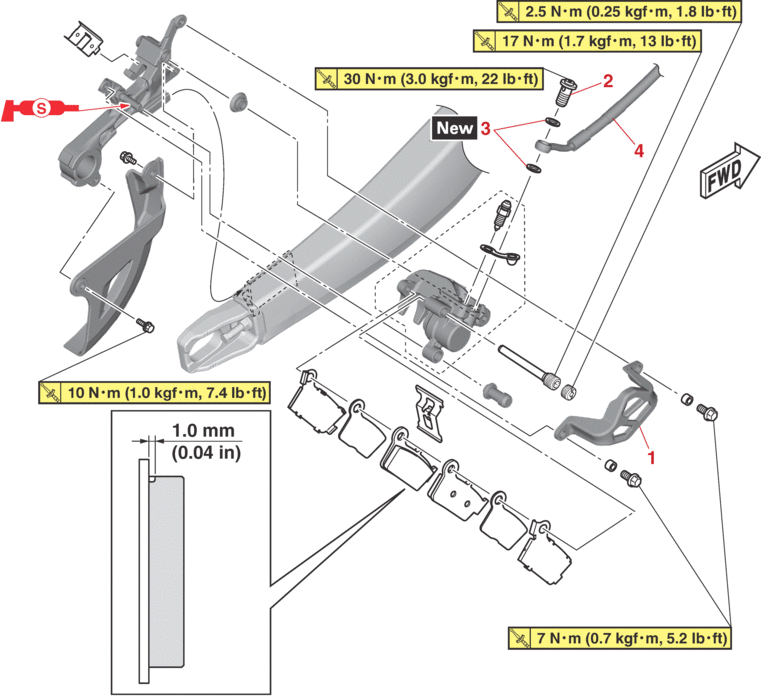 |
|||
|---|---|---|---|
|
Order |
Job/Parts to remove |
Q’ty |
Remarks |
|
|
Brake fluid |
|
Drain. Refer to BLEEDING THE HYDRAULIC BRAKE SYSTEM. |
|
|
Rear wheel |
|
Refer to REAR WHEEL. |
|
1 |
Protector |
1 |
|
|
2 |
Union bolt |
1 |
|
|
3 |
Copper washer |
2 |
|
|
4 |
Rear brake hose |
1 |
|
|
Removing the rear brake caliper 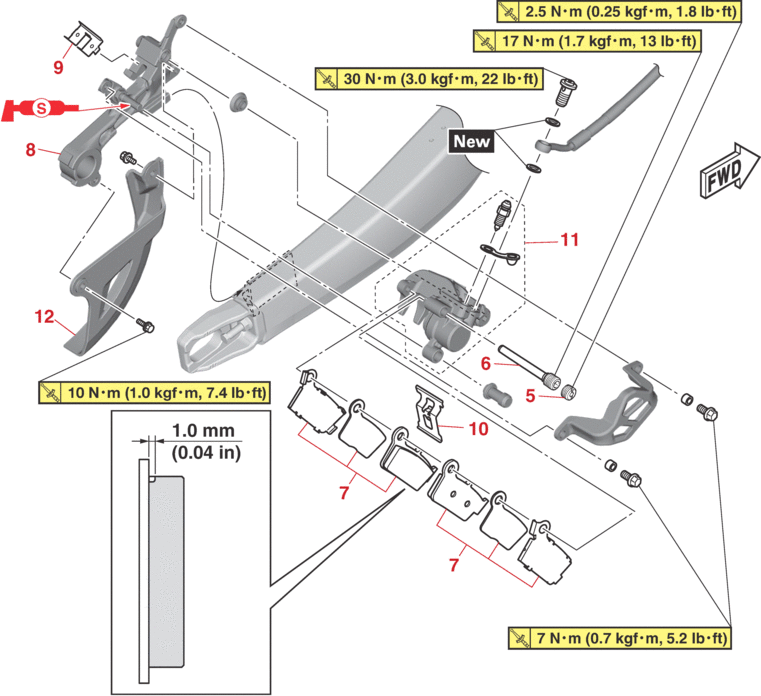 |
|||
|---|---|---|---|
|
Order |
Job/Parts to remove |
Q’ty |
Remarks |
|
5 |
Brake pad pin plug |
1 |
|
|
6 |
Brake pad pin |
1 |
|
|
7 |
Rear brake pad assembly |
2 |
|
|
8 |
Rear brake caliper bracket |
1 |
|
|
9 |
Brake pad spring |
1 |
|
|
10 |
Brake pad spring |
1 |
|
|
11 |
Rear brake caliper assembly |
1 |
|
|
12 |
Rear brake disc cover |
1 |
|
|
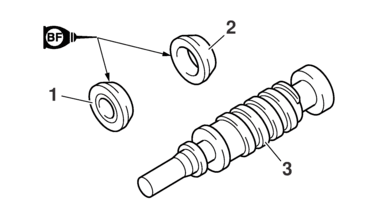
Disassembling the rear brake caliper 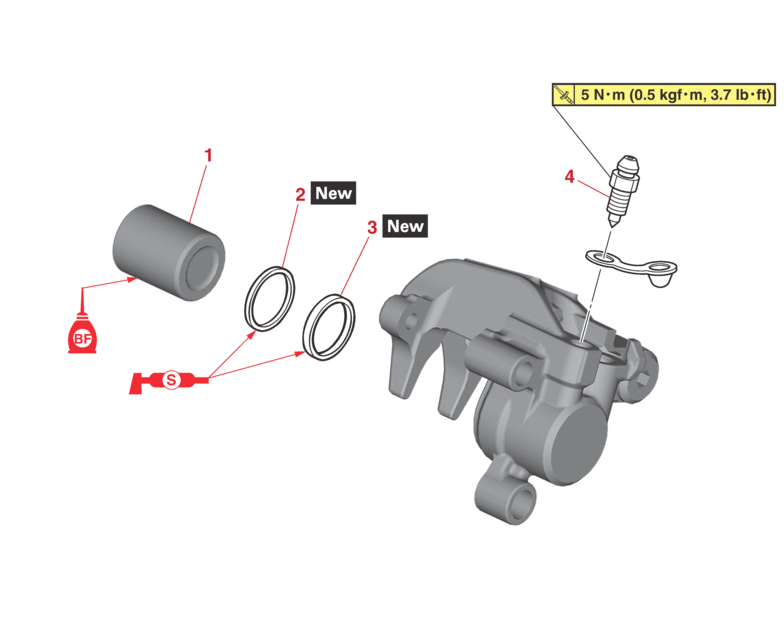 |
|||
|---|---|---|---|
|
Order |
Job/Parts to remove |
Q’ty |
Remarks |
|
1 |
Brake caliper piston |
1 |
|
|
2 |
Brake caliper piston dust seal |
1 |
|
|
3 |
Brake caliper piston seal |
1 |
|
|
4 |
Bleed screw |
1 |
|
|
Removing the rear brake master cylinder 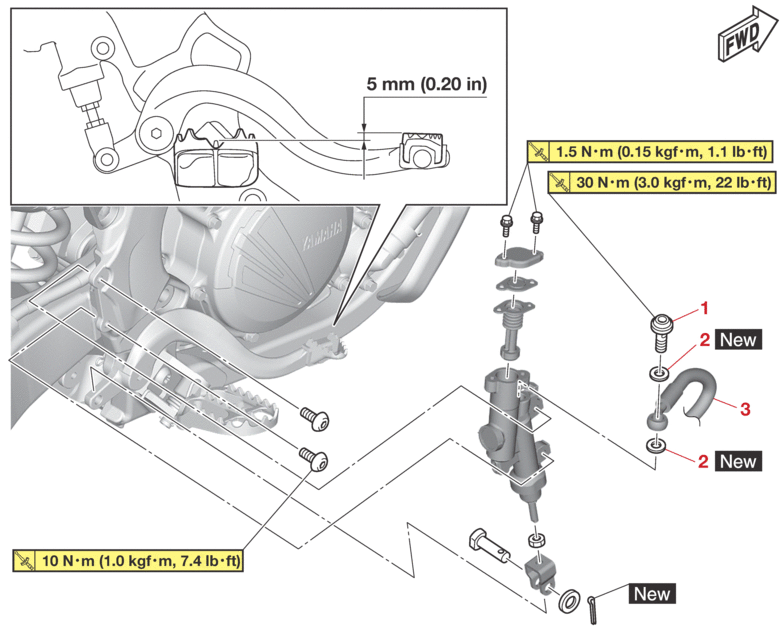 |
|||
|---|---|---|---|
|
Order |
Job/Parts to remove |
Q’ty |
Remarks |
|
|
Brake fluid |
|
Drain. Refer to BLEEDING THE HYDRAULIC BRAKE SYSTEM. |
|
1 |
Union bolt |
1 |
|
|
2 |
Copper washer |
2 |
|
|
3 |
Brake hose |
1 |
|
|
Removing the rear brake master cylinder 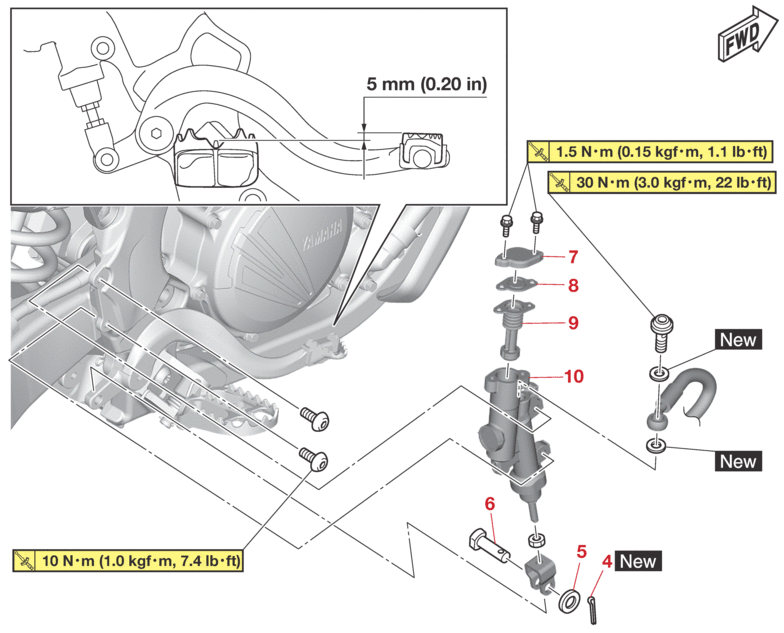 |
|||
|---|---|---|---|
|
Order |
Job/Parts to remove |
Q’ty |
Remarks |
|
4 |
Split pin |
1 |
|
|
5 |
Washer |
1 |
|
|
6 |
Pin |
1 |
|
|
7 |
Brake master cylinder reservoir cap |
1 |
|
|
8 |
Brake master cylinder reservoir diaphragm plate |
1 |
|
|
9 |
Brake master cylinder reservoir diaphragm |
1 |
|
|
10 |
Rear brake master cylinder |
1 |
|
|
Disassembling the rear brake master cylinder  |
|||
|---|---|---|---|
|
Order |
Job/Parts to remove |
Q’ty |
Remarks |
|
1 |
Brake master cylinder joint |
1 |
|
|
2 |
Brake master cylinder kit |
1 |
|
INTRODUCTION
|

CHECKING THE REAR BRAKE DISC
1.Check:
-
Brake disc
Damage/galling → Replace.
2.Measure:
-
Brake disc thickness
Measure the brake disc thickness at a few different locations.
Out of specification → Replace.
Refer to CHECKING THE FRONT BRAKE DISC.
|

3.Measure:
-
Brake disc runout
Out of specification → Replace the brake disc.
Refer to CHECKING THE FRONT BRAKE DISC.
|
4.Replace:
-
Brake disc
Refer to ASSEMBLING THE REAR WHEEL.
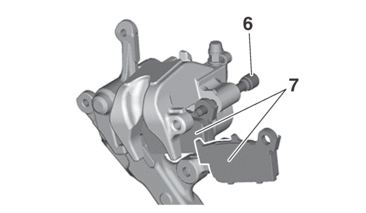
REPLACING THE REAR BRAKE PADS
|

1.Remove:
-
Brake pad
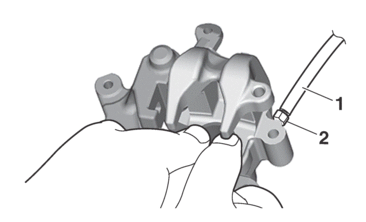
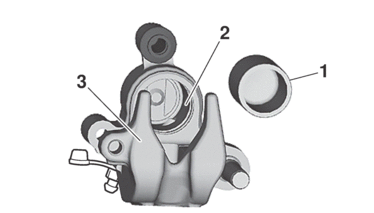
a.Remove the protector “1” and the pad pin plug “2”.

b.Loosen the pad pin “3”.
d.Remove the pad pin “6” and the brake pads “7”.
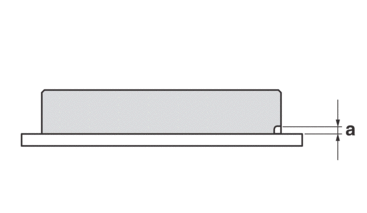
2.Measure:
-
Brake pad wear limit “a”
Out of specification → Replace the brake pads as a set.
|
3.Install:
-
Brake pad
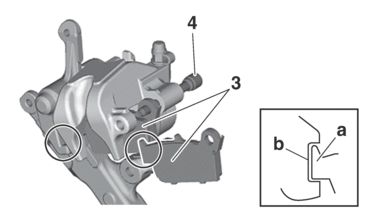
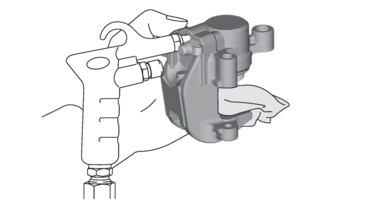
a.Connect the plastic hose “1” to the bleed screw “2” and place a container under the end of the plastic hose.
b.Loosen the bleed screw and push the brake caliper piston in.
|
c.Tighten the bleed screw.
|
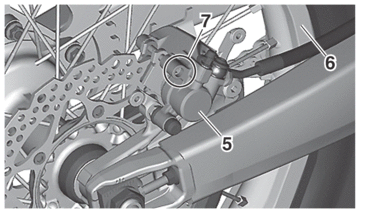
d.Install the brake pads “3” and the pad pin “4”.
|
e.Install the brake caliper “5” and the rear wheel “6”.
Refer to REAR WHEEL.
f.Tighten the pad pin “7”.
|
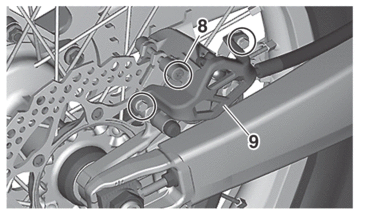
g.Install the pad pin plug “8” and the protector “9”.
|
4.Check:
-
Brake fluid level
Refer to CHECKING THE BRAKE FLUID LEVEL.
5.Check:
-
Brake pedal operation
A softy or spongy feeling → Bleed the brake system.
Refer to BLEEDING THE HYDRAULIC BRAKE SYSTEM.
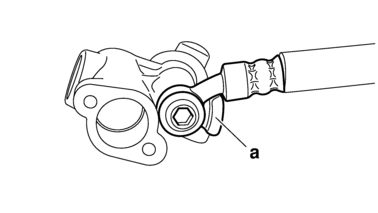
REMOVING THE REAR BRAKE CALIPER
|
1.Remove:
-
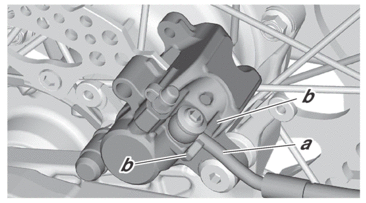
Union bolt
-
Copper washer
-
Brake hose
|
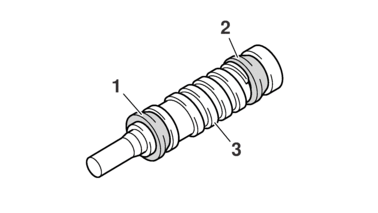
DISASSEMBLING THE REAR BRAKE CALIPER
1.Remove:
-
Brake caliper piston “1”
-
Brake caliper piston dust seal “2”
-
Brake caliper piston seal “3”

a.Blow compressed air into the brake hose joint opening to force out the piston from the brake caliper.
|
b.Remove the brake caliper piston dust seal and the brake caliper piston seal.
CHECKING THE REAR BRAKE CALIPER
1.Check:
-
Brake caliper piston “1”
Rust/scratches/wear → Replace the brake caliper piston.
-
Brake caliper cylinder “2”
Scratches/wear → Replace the brake caliper assembly.
-
Brake caliper body “3”
Cracks/damage → Replace the brake caliper assembly.
-
Brake fluid delivery passages
(brake caliper body)
Obstruction → Blow out with compressed air.
|
2.Check:
-
Brake caliper bracket
Crack/damage → Replace.
ASSEMBLING THE REAR BRAKE CALIPER
|
|

INSTALLING THE REAR BRAKE CALIPER
1.Install:
-
Rear brake caliper
-
Rear brake caliper bracket
2.Install:
-
Rear wheel
Refer to REAR WHEEL.
-
Copper washer

-
Brake hose
-
Union bolt
|
|
|

3.Install:
-
Brake pad spring
-
Brake pad
-
Brake pad pin
-
Brake pad pin plug

-
-
Brake pad pin
17 N·m (1.7 kgf·m, 13 lb·ft)
-
Brake pad pin plug
2.5 N·m (0.25 kgf·m, 1.8 lb·ft)
-
Refer to CHECKING THE REAR BRAKE PADS.
4.Pour brake fluid to the brake fluid reservoir up to the specified level.
|
|
|
5.Bleed:
-
Brake system
Refer to BLEEDING THE HYDRAULIC BRAKE SYSTEM.
6.Check:
-
Brake fluid level
The minimum level mark or below → Add.
Refer to CHECKING THE BRAKE FLUID LEVEL.
7.Check:
-
Brake pedal operation
A softy or spongy feeling → Bleed the brake system.
Refer to BLEEDING THE HYDRAULIC BRAKE SYSTEM.
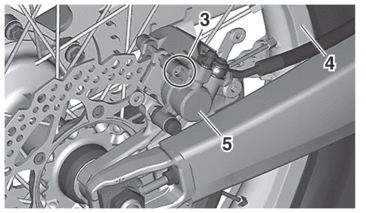
REMOVING THE REAR BRAKE MASTER CYLINDER
|
1.Remove:
-
Union bolt
-
Copper washer
-
Brake hose
|
CHECKING THE REAR BRAKE MASTER CYLINDER
1.Check:
-
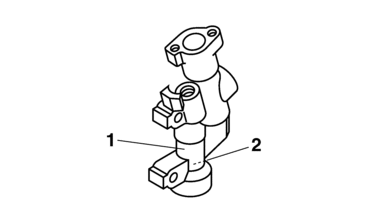
Brake master cylinder “1”
Damage/scratches/wear → Replace.
-
Brake fluid delivery passages “2”
(brake master cylinder body)
Obstruction → Blow out with compressed air.
2.Check:
-
Brake master cylinder reservoir cap
Crack/damage → Replace.
-
Brake master cylinder reservoir diaphragm holder
-
Brake master cylinder reservoir diaphragm
Crack/damage → Replace.
3.Check:
-
Brake hose
Cracks/damage/wear → Replace.
ASSEMBLING THE REAR BRAKE MASTER CYLINDER
|
|
1.Wash the brake master cylinder with brake fluid.
2.Install:
-
Primary cylinder cup “1”
-
Secondary cylinder cup “2”
(to the brake master cylinder piston “3”)
|
3.Install:
-
Spring “1”
(to the brake master cylinder piston “2”)
|
4.Install:
-
Brake master cylinder piston assembly “1”

-
Push rod “2”
-
Circlip “3”

-
Dust boot “4”
|
INSTALLING THE REAR BRAKE MASTER CYLINDER
1.Install:
-
Copper washer

-
Brake hose
-
Union bolt
|
|
|
2.Pour brake fluid to the brake fluid reservoir up to the specified level.
|
|
|
3.Bleed:
-
Brake system
Refer to BLEEDING THE HYDRAULIC BRAKE SYSTEM.
4.Check:
-
Brake fluid level
The minimum level mark or below → Add.
Refer to CHECKING THE BRAKE FLUID LEVEL.
5.Check:
-
Brake pedal operation
A softy or spongy feeling → Bleed the brake system.
Refer to BLEEDING THE HYDRAULIC BRAKE SYSTEM.