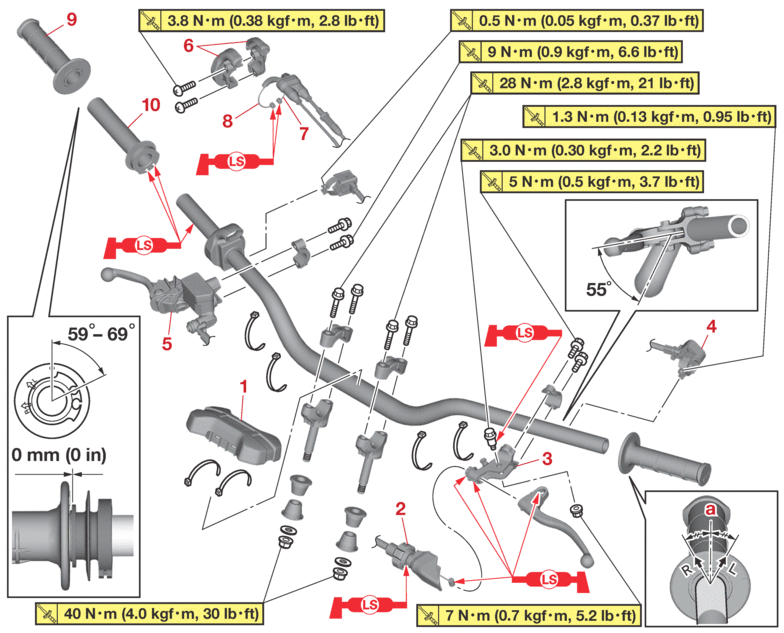
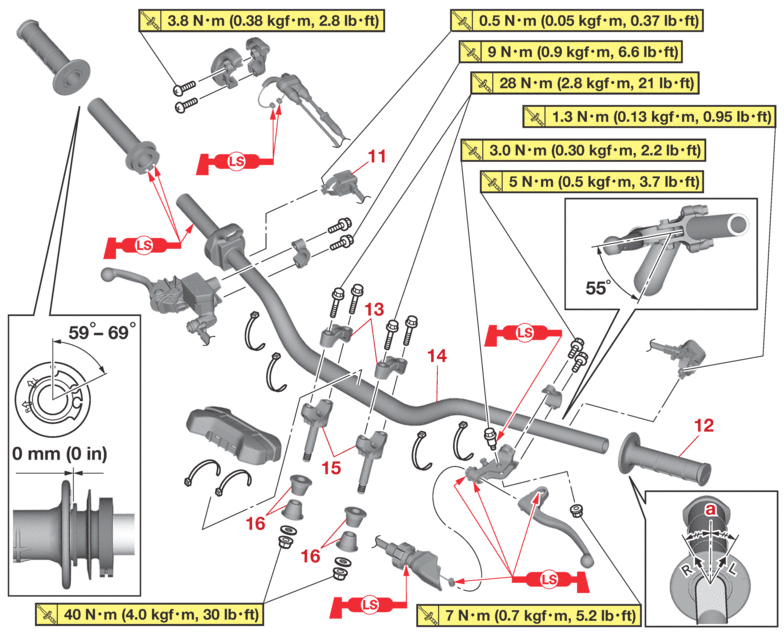
HANDLEBAR

Removing the handlebar

Order

Job/Parts to remove

Q’ty

Remarks


Headlight


Refer to GENERAL CHASSIS.

1

Handlebar protector

1


2

Clutch cable

1

Disconnect.

3

Clutch lever holder

1


4

Handlebar switch (left)

1


5

Brake master cylinder

1


6

Throttle cable housing

1


7

Throttle cable (pull)

1

Disconnect.

8

Throttle cable (return)

1

Disconnect.

9

Handlebar grip (right)

1


10

Tube guide

1


Removing the handlebar

Order

Job/Parts to remove

Q’ty

Remarks

11

Start switch

1


12

Handlebar grip (left)

1

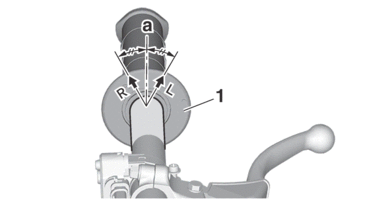
Install the handlebar grip (left) to the handlebar so that the line “a” between the two arrow marks faces straight upward.

13

Upper handlebar holder

2


14

Handlebar

1


15

Lower handlebar holder

2


16

Damper

4


REMOVING THE HANDLEBAR

1.Stand the vehicle upright on a level surface.

Securely support the vehicle so that there is no danger of it falling over.

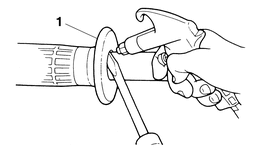
2.Remove:

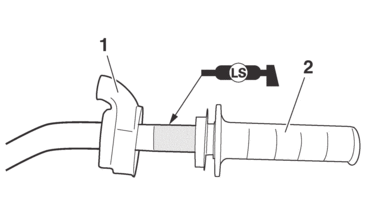
  • Grip “1”

Blow in compressed air between the handlebar or tube guide and the grip. Then remove the grip which has become loose.

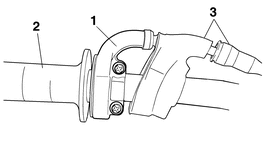
3.Remove:

  • Throttle cable housing “ 1”

  • Throttle grip “2”

While removing the throttle cable housing, pull back the rubber cover “3”.

CHECKING THE HANDLEBAR

1.Check:

  • Handlebar

    Bends/cracks/damage → Replace.

Do not attempt to straighten a bent handlebar as this may dangerously weaken it.

INSTALLING THE HANDLEBAR

1.Stand the vehicle upright on a level surface.

Securely support the vehicle so that there is no danger of it falling over.

2.Install:

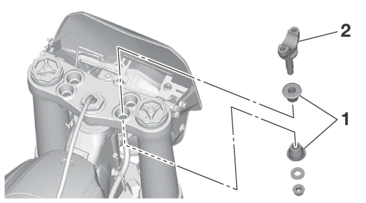
  • Damper “1”

  • Lower handlebar holder “2” (temporarily)

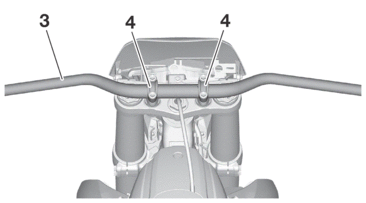
  • Handlebar “3”

  • Upper handlebar holder “4”

  • Upper handlebar holder bolt

    28 N·m (2.8 kgf·m, 21 lb·ft)

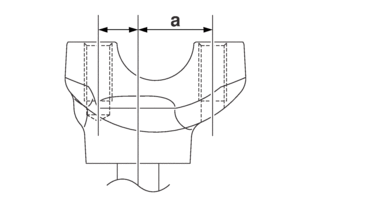
  • Install the lower handlebar holders with the side having the longer distance “a” from the mounting bolt center facing towards the front side of the vehicle.

  • Installing the lower handlebar holders in the reverse direction allow the front-to-rear offset amount of the handlebar position to be changed.

  • Installing the lower handlebar holder holes from the back to the front allows front-to-rear offset amount of the handlebar position to be changed.

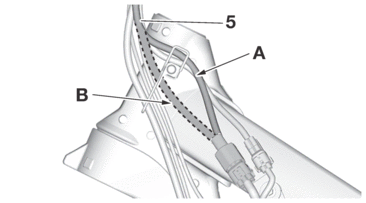
  • When installing the dampers and the lower handlebar holders in the front hole, be sure to route the handlebar switch lead (left) “5” as shown in the illustration.

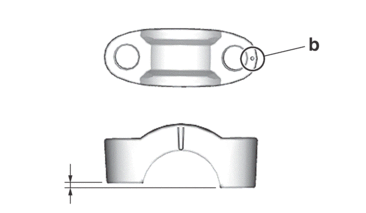
  • The upper handlebar holders should be installed with the punch marks “b” facing forward.

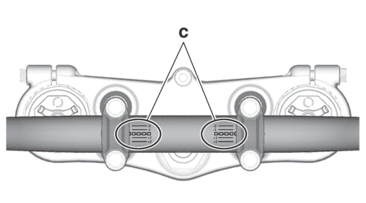
  • When installing the handlebar, make sure that right and left marks “c” are in place identically on both sides.

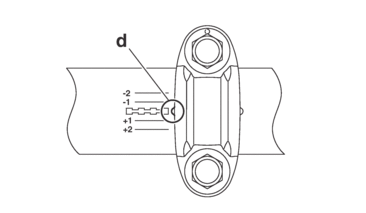
  • Install the handlebar so that the projection “d” of the upper handlebar holders is positioned at the mark on the handlebar as shown.

  • First, tighten the bolts on the front side of the handlebar holder, and then on the rear side.

  • Turn the handlebar all the way to the left and right. If there is any contact with the fuel tank, adjust the handlebar position.

A.

Routing when installing the damper and lower handlebar in the rear holes

B.

Routing when installing the damper and lower handlebar in the front holes

3.Tighten:

  • Lower handlebar holder nut

  • Lower handlebar holder nut

    40 N·m (4.0 kgf·m, 30 lb·ft)

4.Install:

  • Clutch lever holder “1”

  • Clutch lever “2”

  • Clutch lever holder bolt

    5 N·m (0.5 kgf·m, 3.7 lb·ft)

  • Clutch lever pivot bolt

    3.0 N·m (0.30 kgf·m, 2.2 lb·ft)

  • Clutch lever pivot nut

    7 N·m (0.7 kgf·m, 5.2 lb·ft)

  • After tightening the clutch lever pivot bolt, tighten the clutch lever pivot nut, while holding the clutch lever pivot bolt to prevent it from turning.

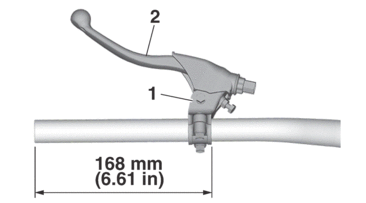
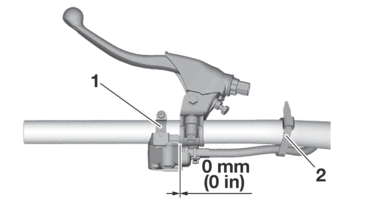
  • The clutch lever holder “1” should be installed according to the dimensions shown.

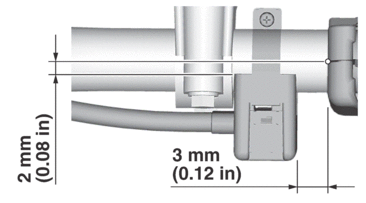
5.Install:

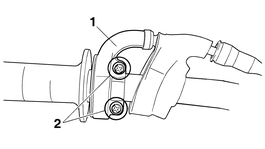
  • Handlebar switch (left) “1”

  • Clamp “2”

  • Handlebar switch (left)

    1.3 N·m (0.13 kgf·m, 0.95 lb·ft)

  • The handlebar switch (left) “1” should be installed according to the dimensions shown.

  • Pass the handlebar switch lead (left) through the middle of the clutch lever holder.

6.Install:

  • Handlebar grip (left) “1”

a.Slightly coat the handlebar left end with a rubber adhesive.

b.Install the handlebar grip (left) on the handlebar by pressing the grip from the left side.

c.Wipe off any excess adhesive with a clean cloth.

Install the handlebar grip (left) to the handlebar so that the line “a” between the two arrow marks faces straight upward.

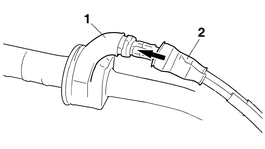
7.Install:

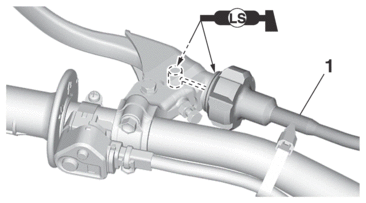
  • Clutch cable “1”

Before installation, apply the lithium-soap-based grease to the clutch cable end.

8.Adjust:

  • Clutch lever free play

    7.0–12.0 mm (0.28–0.47 in)

9.Install:

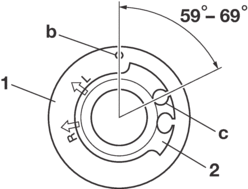
  • Handlebar grip (right) “1”

    Apply adhesive to the tube guide “2”.

  • Before applying the adhesive, wipe off grease or oil on the tube guide surface “a” with a lacquer thinner.

  • Install the grip to the tube guide so that the grip match mark “b” and tube guide slot “c” form the angle as shown.

10.Install:

  • Rubber cover “1”

  • Throttle grip “2”

Apply the lithium-soap-based grease on the throttle grip sliding surface.

11.Install:

  • Throttle cable “1”

Slightly coat the end of throttle cable and inside of throttle grip with lithium-soap-based grease. Then, mount the throttle grip onto the handlebar.

12.Install:

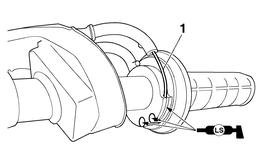
  • Throttle cable housing “1”

  • Screw (throttle cable housing) “2”

  • Screw (throttle cable housing)

    3.8 N·m (0.38 kgf·m, 2.8 lb·ft)

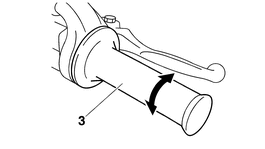
After tightening the throttle cable housing screws, check that the throttle grip “3” moves smoothly. If it does not, retighten the screws for adjustment.

13.Install:

  • Rubber cover “1”

  • Cover (throttle cable housing) “2”

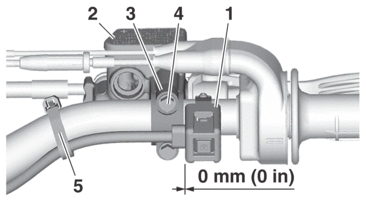
14.Install:

  • Start switch “1”

  • Front brake master cylinder assembly “2”

  • Front brake master cylinder holder “3”

  • Front brake master cylinder holder bolt “4”

  • Clamp “5”

  • Front brake master cylinder holder bolt

    9 N·m (0.9 kgf·m, 6.6 lb·ft)

  • Install the front brake master cylinder holder with the “UP” mark facing up.

  • Install in order for the top of the front brake master cylinder assembly to be level.

  • First, tighten the upper bolt, then the lower bolt.

  • Pass the start switch lead through the middle of the front brake master cylinder holder.

15.Adjust:

  • Throttle grip free play

    3.0–6.0 mm (0.12–0.24 in)